Pattern Play Calendar Project: DIY Mini Envelopes
![](https://cdn.shopify.com/s/files/1/0467/9755/3828/files/20220108_101011_feature_image_240x240.jpg?v=1641829462)
Hopefully you have gotten your 2022 Pattern Play Calendar and if you remember, we told you it was SO much more than a calendar. Well, today, I'll showing you how you can turn one page of the calendar into a cute little envelope. This little envelope is perfect to give your honey a sweet Valentine. DIY photos and steps to follow. Have fun!
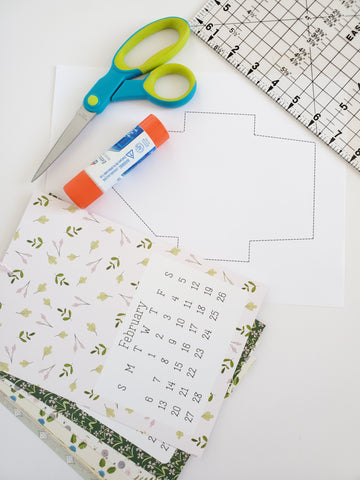
What you will need:
One sheet from your Pattern Play Calendar
Envelope Template - Click HERE to get for free!
Pencil
Scissors
Glue Stick
Ruler
![](https://cdn.shopify.com/s/files/1/0467/9755/3828/files/20220108_093129_480x480.jpg?v=1641829775)
![](https://cdn.shopify.com/s/files/1/0467/9755/3828/files/20220108_093251_480x480.jpg?v=1641830125)
![](https://cdn.shopify.com/s/files/1/0467/9755/3828/files/20220108_093915_480x480.jpg?v=1641830175)
Steps to Make Mini Envelope:
1. Print out envelope template attached above. Cut along dotted lines to create a pattern. Trace that pattern onto your pattern calendar sheet. Position the template as seen above in the photo to trace.
![](https://cdn.shopify.com/s/files/1/0467/9755/3828/files/20220108_094130_480x480.jpg?v=1641830347)
![](https://cdn.shopify.com/s/files/1/0467/9755/3828/files/20220108_094427_480x480.jpg?v=1641830383)
![](https://cdn.shopify.com/s/files/1/0467/9755/3828/files/20220108_094631_480x480.jpg?v=1641830417)
2. After you trace the envelope template onto the calendar sheet, then cut along the dotted lines to create your envelope template shape.
![](https://cdn.shopify.com/s/files/1/0467/9755/3828/files/20220108_094744_480x480.jpg?v=1641830513)
![](https://cdn.shopify.com/s/files/1/0467/9755/3828/files/20220108_094814_480x480.jpg?v=1641830555)
![](https://cdn.shopify.com/s/files/1/0467/9755/3828/files/20220108_094926_480x480.jpg?v=1641830604)
3. Using a ruler, fold in the two side flaps and bottom flap.
![](https://cdn.shopify.com/s/files/1/0467/9755/3828/files/20220108_094959_480x480.jpg?v=1641830700)
![](https://cdn.shopify.com/s/files/1/0467/9755/3828/files/20220108_095034_480x480.jpg?v=1641830736)
![](https://cdn.shopify.com/s/files/1/0467/9755/3828/files/20220108_095130_480x480.jpg?v=1641830786)
4. Fold the two side flaps in and the bottom flap up as shown above. Then, fold over the top flap to form the envelope. Using a glue stick, glue the bottom flap to the side flaps. A little glue on the edge of the side flaps is al you need. Fold back together and hold closed for glue to adhere.
![](https://cdn.shopify.com/s/files/1/0467/9755/3828/files/20220108_095233_480x480.jpg?v=1641830945)
![](https://cdn.shopify.com/s/files/1/0467/9755/3828/files/20220108_100602_480x480.jpg?v=1641830990)
![](https://cdn.shopify.com/s/files/1/0467/9755/3828/files/20220108_101011_480x480.jpg?v=1641831032)
5. You can use another sheet of paper or cardstock to cut a small card to slide into the envelope. Add your message and voila...a pretty little Valentine.
You can also use this DIY project to create a gift card envelope for a friend's birthday, a wedding gift or just a little thank you note for a friend or family member. Happy Making!
![](https://cdn.shopify.com/s/files/1/0467/9755/3828/files/Allisons_signature_for_blogs_480x480.png?v=1628378144)